|
Note: I have placed both articles together because they are tightly
linked. The first places more emphasis on design and the second on construction, and both should be read by anyone undertaking such a task. However, you can jump ahead to Making
Your Own Bags. In
explaining how and why I designed my bags as I did, I am not expecting
anyone to fall into step. Hopefully, my ideas can help you design and make
your own bags the way you want them.
My Touring Bags
My 1966 touring bags.
|
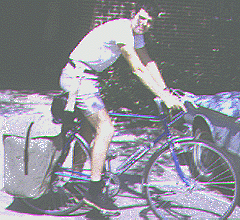
Since I have always been the kind of person that wants to do everything for myself, designing and sewing my own bike bags came natural to me. When I first started riding a bike as an adult in college in 1964, I needed some pannier bags to carry books to school, clothes to the laundry, and groceries home, so I designed my own, not only to be independent, but also because suitable panniers were not available at that time. I later used them on my week-long bike trip to the Smokies, although they were rather small for that purpose. In 1966,
when I planned a trip to Canada, I designed a second set of panniers for extended touring which worked fairly well. They were large enough to allow me to carry two wool blankets inside. The biggest fault of these second bags was that all the weight was in the rear. Two other problems were that the bags could not be removed from the bike without emptying them first (the two panniers were really one single bag, connected at the top) and that, since everything was two large pockets, everything had to be removed to get to anything. Nonetheless, they allowed me to travel nearly 3,800 miles on four trips without serious problem. Both my 1966 bags and 1964 bags were made of a light canvas material, and my mother did most of the work, sewing them on a machine.
My 1971 bags.
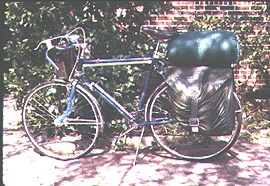
| In 1970, when I began planning a new trip to Canada, I designed my third set of bags, made of waterproof nylon, and I sewed them by hand. A new feature was that the panniers were separate bags, joined by nylon straps at the top (this meant that both bags had to be removed at the same time). After I married the next year, I sewed a similar set for my wife. (I still have my bags, but they are not usable with the current small rear racks -- racks back then were 18 inches long.) When I made these bags, I was aware of the problem of carrying all the weight on the rear; however, no front racks were currently available, so I hung my camera bag from the handlebars. These bags also have the fault of lacking any separate pockets. Since I used them on just two trips, covering 550 miles, I am not aware of other shortcomings.
My 1990 bags in 1990.
| When I needed touring bags in 1986, I was under
the mistaken impression that design had gotten ahead of me, so I bought a front
and back set of Nashbar (actually Cannondale) bags. These bags, which I used
on my 1988 long trip and many local trips, were not
waterproof, and they did not contain enough space for necessary gear for
my Colorado trip, so I took them apart in 1990 (they were in sad shape by that time) and used the plastic frames to support
the bags I use today, which have traveled about 24,000 miles on touring trips. I also designed and made my own handlebar bag which
is unlike any other. All of the current set of bags are hand-stitched. They are not perfect and demonstrate my lack of knowledge and skill in sewing. I failed to allow enough material for fraying, I did not seal any edges, and I used the original zippers, all of which mistakes have caused some reworking. In spite of the bags' assorted faults and oddities, they have traveled very well and have kept my gear dry.
Principles of Touring Bag Design
The principles behind
touring bag design are few in number. The bags should 1) be fairly simple,
but provide separate pockets for unmixable items, such as food and gasoline, and for items you want to keep separate, such as wet raingear,
2) protect gear from water in the heaviest rain, 3) allow the
weight to be carried low on the bike, 4) distribute the weight front and back to improve control, 5) not foul the wheels or cause any swaying, and 6) provide sufficient room to carry everything you need.
Handlebar Bags
Perhaps the most
poorly designed bag commonly sold is the handlebar bag. Hanging high above
the center of gravity and on the handlebars, where steering is most strongly
affected, yet able to sway back and forth, the US style handlebar bag
is nothing short of a poor design. Adding cords to prevent swaying just
creates additional problems.
However, the location
of a handlebar bag makes good sense. For those small items that you need
to be able to get to quickly, such as camera, chapstick, binoculars, maps,
keys, and wallet, having to dismount, awkwardly hold the bike, and look through your panniers just does not make sense. By the time you have found the binoculars, the bird has flown.
In looking at pictures
of bikes from other countries, I noticed that the handlebar bags were attached to the front carrier instead of to the handlebars. And the front racks sold up until the late 80's offered a good support for such a bag, even
though American manufactures ignored this support.
My Handlebar Bag
So I designed a
little bag that sits on my front rack of the old design. To have a free-standing bag, I purchased a small plastic trash can with a base of the same size and shape
as the top of the front rack, cut it off level with the handlebars, covered
it inside and out with pack material, and made a mushroom-shaped cover
by sewing a larger piece of pack cloth to the perimeter of another piece cut
somewhat larger than the opening. A zipper goes around the top of the bag and around the bottom of the cover. The bag attaches to the rack with straps hidden
underneath fastened with simple buckles. This bag is perfect for small
items that need to be quickly found as they are in ready reach; at the
same time, it does not affect the handling of the bike at all because it
does not sway (however, it can affect handling if I put my heavy tool bag into it). And I can remove it within two minutes if I so desire. The dimensions of this bag are 5 inches wide (side to side), 8 inches deep (top to bottom), and 8 inches long (front to back), two inches shorter than the rack because of the handlebars, a total of 270 cubic inches.
Advantages of the "High" Front Rack
One problem with
making such a bag is that high front racks are now hard to find. Nonetheless,
I consider high racks superior to the low riders for five additional reasons:
1) the rack is stronger, 2) it is attached more securely, 3) it also provides
an excellent location for the front light, 4) it allows room for
larger front bags, and 5) there is better ground clearance in the front.
Origin of the Low-Rider Rack
Then, how did the
low-rider racks come about? Jim Blackburn, who produces bike racks, made
some tests to determine the best weight distribution on a bike. After a
number of trials, he determined that the weight on the rear did not need
to be extra low but that the weight on the front should be low and centered
on the wheels. This setup not only requires low-rider front racks, but
it also requires that the front bags be small. When Jim Blackburn made
his test, I'm sure he was being objective. I know Bicycling made
the same test, using bags full of beans, and came to the same conclusion.
The Lack of Room Encouraged by Low-Rider Racks
The reason
these tests don't prove anything is that people don't carry beans on their bikes! Unlike beans, camping equipment is lightweight and bulky. Most camping cyclists carry a tent, sleeping bag, several day's supply of clothing, and rain clothing, all of which is bulky. There is simply not enough room in the tiny front panniers mandated by the low-rider racks nor in most of the rear panniers sold to go with them.
Those who are not campers sometimes suggest that the solution is to simply carry a very small amount of gear, such as carrying only one spare set of clothing, a tiny tent, and no raingear. However, the cyclist who follows such advice can have a poor trip if the weather turns rainy.
Long-distance hikers on the Appalachian Trail often carry 40 to 70 pounds in spite of the fact that they have to carry everything on their backs up and down mountains. They aren't carrying that gear because they enjoy the weight but because they need the supplies. There is a new group of extra-light hikers who carry less gear, but they depend upon staying in shelters at night, and they have to travel more quickly to the next stop because their food will soon run out. They also have to hope that the weather will be kind. It's an interesting strategy for completing the Appalachian Trail more quickly, but it isn't necessarily a better trip.
While I don't have to carry as much food as a backpacker (because I pass grocery stores frequently), I do have to carry all the same gear (except for the heavy shoes), and I have to carry maps of many areas (state and forest maps) and clothing for different climates. I also have to carry bike supplies, such as a spare tire, spare tube, tools, air pump, and grease. In addition, I carry stuff that isn't necessary, such as camera, tripod, laptop, and books. And unlike the backpacker, I buy bulky fresh food items, such as bread, donuts, cauliflower, broccoli, and carrots. In addition, the extra weight is not the problem for me as it is for the backpacker. On one and two-day trips, I average the same speed with all my touring load as I do when riding locally without all that weight.
Balance Problems Created by Low-Rider Design
Because
of the undersized bags available to them, bike travelers have to make a
pile of gear on their rear carriers that at least includes the tent, mattress,
and sleeping bag. This extra weight, piled high in the rear, hurts bike
handling far more than the small bags up front help. Last year, I helped another cyclist by pushing his bike by the handlebars just a short distance, and the bike practically twisted out of my hands! With the bike so badly balanced, extra steering control must be used at all times, and mounting the bike cowboy-style (as I usually do) is impossible. In fact, just leaning the bike against a tree becomes more difficult. In addition, the gear
piled on top in the back is more likely to get wet or to get loose and
cause trouble. In addition, there is little room for food.
My Design, and Why It Is Better
My touring bags in 2000.
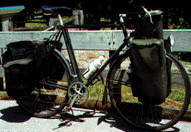
| So, I designed
my own panniers to be extra large front and rear. After my bike is loaded in
the summer, there is usually still empty space inside at the top of each bag and enough room inside one of the rear bags for a full loaf of bread (This extra space disappears in cold weather when my clothing is bulkier). I use this extra space for pears, apples, bananas, and donuts to eat along the way. All that sits on top of my rear carrier is a light-weight solar panel.
As a result, the
weight distribution on my bike is low, front and back (when I am standing, the weight is below my knees), and my bike handles much better than a bike with a pile of gear in the back. The stability of the bike feels greater when loaded than when empty. And I always have the extra room on top of the rear carrier if I should ever need it.
My Front Bags
My front bags are
10 inches front to back (the same length as the front carrier), 17 inches deep from top to bottom, 6 inches wide from inside to outside, and ride 12 inches off of the ground (I wanted a little extra clearance underneath the bags because I push the bike back into the woods). Since these bags
don't interfere with my feet, their shape is regular, and
the space in them is 1,020 cubic inches each, not allowing for stretch.
One bag holds my sleeping bag and tripod, and the other holds the tent and tent poles. There is enough
space inside both of them for some food and additional gear
as well. When making them, I made the fabric an inch wider and four inches
deeper than the Cannondale frames. This extra size has caused no problems whatsoever,
but without it, the tent and sleeping bag would not fit inside. I also
added a pocket on the bottom outside rear of each bag. These pockets hold my water bottles (both out of the sun and yet within easy reach), maps, and bandana (the outside pockets are not included in the volume estimate above).
My Rear Bags
My rear bags are
also 17 inches deep from top to bottom and 12 inches off of the ground. In addition to being four inches deeper and one inch wider than the original bags, they have also
two long vertical pockets (really tubes) in the rear each made from a single loop of fabric to allow the rear bags to be longer than the rack they are attached to. Thus, the panniers have the 13-inch length of the rack plus another 5 inches length supplied by the rear pockets. The rear pockets are a little shorter than the rest of the bags, being even with the bottom, but 3 inches shorter at the top and covered with a sloping flap. The main pockets are, of course, 17 inches from top to bottom, 13 inches from front to back (with a large cut-out for my feet), and 6 inches wide from inside to outside. Finally, attached to the outside of the main compartment of each bag is a large side pocket 12 inches deep (from top to bottom) and 3 1/2 inches wide (from side to side). Taking the shape of the compartments into account, I can calculate the main bag as being very close to 1,200 inches, the rear pocket adds 275 inches, and the side pocket adds 400 inches, a total of 1,875 cubic inches for each pannier. By the way, I should point out that the size of commercial bags is often exaggerated. These bags look enormous right alongside bags advertised at 1,500 cubic inches each.
The vertical pocket on one side holds my stove, gasoline, and water filter, and the vertical pocket on the other side holds my Thermorest sleeping mattress. The one
main bag holds my clothes and laptop; the other holds pots, food, tools,
maps, and books. Finally, the large pockets on the bottom outsides
of these bags holds my rain gear on one side and my spare tire, tube,
grease, batteries, and small items on the other. Of course, I balance the weight to some extent by not putting all of the heavy stuff on the same side.
Attaching the Panniers to the Bike
The Cannondale frames that I use attach with two hooks to the carriers and via long springs to hooks on the axle eyelets. Later, Cannondale added levers to lock their frames to the racks, but my panniers didn't have this feature. While coming down a steep mountainside at about 50 mph, I hit a bad bump, the bag bounced off of the carrier, hit my rear wheel, and was hurled over 50 feet. If it had locked the wheel, I would have been the one hurling through the air. The bag's fabric was badly torn from this event, ending its usefulness, and helping to give me an incentive to make new bags for the old frames. In making my bags, I retained the original hooks and springs but I added additional webbing, front and rear, to additionally tie the frames to the racks. I highly recommend this kind of redundancy.
One Little Complication
In designing my bags, I did something that very few pannier bag manufactures ever do. I covered the skewers with the bags! In addition, I covered the rear derailleur as well! This was not an accident but a deliberate decision, as I wanted to keep the weight very low. Do these changes cause any harm? None that I can see, after many miles. The skewers are harder to reach, but I can still remove either the front or rear wheel without removing the bags, although when repairing a tire, it is often easier to go ahead and remove the bags anyway. The rear derailleur has been resting against my three-quart pot on every trip, and I can't see that either the derailleur or the hanger has been harmed. The derailleur can't rotate as far, but I think this rotation is used only when removing the rear wheel anyway. If I felt it was necessary, I could keep clothing in that pannier, avoiding any possible problem (some bicycles have derailleur hangers that are prone to break, so it would be wise to keep pots away from them!). I might add that my earlier bags also covered the axles and rear derailleur without causing problems.
Conclusion of the Discussion of My Pannier Bags
Besides lowering
the weight (yes, the higher front rack allows a lower overall height -
everything I carry except the handlebar bag is below my knees), putting
everything inside my big bags keeps them dry, avoids problems caused by
loose gear, cuts wind resistance, and reveals less to potential thieves.
These bags have
traveled over 24,000 miles with me and their size has never caused me any
inconvenience. Actually, when compared to backpacking bags, they are not especially big. Their total volume is 6,060 cubic inches, while the main bag alone of some expedition backpacks is over 5,000 cubic inches. Of course, because of their size, I never use them except
when on a camping trip. The only time I've carried something on top of
the rear rack (other than the solar panel) was when I was carrying a five-pound inflatable rubber raft
on a fishing trip.
The weight carried within the bags varies from trip to trip and day to day, as I adjust the gear I carry to the needs of the trip and as my food supplies are constantly changing. I last weighed my bags on my year 2000 trip while at my sister's house in New Jersey. The two rear panniers weighed 19 pounds each, and the two front panniers weighed 4 pounds each. I did not weigh the handlebar bag separately, but it added less than 4 pounds to the total weight of the bike; thus, at that time, I had about 50 pounds of gear (and bags) on the bike, and ¾ths of that weight was on the rear.
Making Your Own Bags
I wish to encourage those who want to design and create their own panniers. I designed bags for myself in 1964, 1966, 1971, and 1990, and all of these bags worked as well as or better than I anticipated. On the other hand, the bags that I have purchased have been less satisfactory. One set, which I am still using, is well-made, but far too small. Although advertised as touring bags, they are just big enough to hold my laptop on one side and my rainsuit on the other. The other set was not waterproof and included useless tiny pockets.
However, I did make some minor mistakes in design and execution -- a problem you will probably have as well. My worst error with my last bags was in not sealing the edges
of the fabric along the zippered openings. I had to sew in more material to correct that fault. In spite of various oddities and faults, the bags are now eleven years old and are into their second millennium. Unless something drastic happens, I think they will easily last another eleven years. Unless something drastic happens, I think they will easily last another eleven years.
The first task in making your own touring bags is to find a source for waterproof nylon and nylon zippers. I have found two: Campmor
sells several grades of nylon cloth and even a canvas duck. The company also has buckles and webbing and other useful items, such as the Speedy Stitcher, which allows you to sew with an oversized cord, perfect for fastening webbing. These are found in their catalog under "Tent Accessories." Seattle
Fabrics offers a much wider choice, offering almost any material in every color. The catalog includes general books on sewing and designs for many kinds of clothing, including cycling clothing and rainwear. There is even a design for bicycle panniers, but (unless the drawing is inaccurate) I wouldn't recommend it. Every kind of buckle and fastener is included, along with tools, one looking similar to the Speedy Stitcher.
In making bags,
you can either go completely on your own or your can find some worn-out
bags and use them as the basis for your design. In 1990, having some worn-out Cannondale bags, I chose to use their frames for my new bags, thus simplifying some problems. There are an awful lot of old touring panniers out there, many made by Cannondale, and if you can find a complete set, it will simplify the task. If you use a pre-made frame, note
that you can take great liberties with the original design. My bags are deeper, wider, and longer
that the originals without causing any problems (the extra length, behind
the rear carrier, consists of a large pocket made from a single large loop
of fabric). I also added in straps and buckles at the top in case one of the panniers should bounce off of its hooks when coming down a bumpy hill (on my year 2000 trip, this happened with both rear bags at the same time, but the straps saved me).
If you do not have
a frame to start with, you can -- if you want to -- do without one, as the main purpose of the frame is to hold the bag in shape when partially or completely empty.
A bag without a frame can still be very large. My 1966 and 1971 bags lacked a frame, but worked just fine. I doubled the inside panel and cut a piece of cardboard to fit between the two pieces of fabric, which worked adequately. The basic trick in getting the bags to hold their shape, however, was in careful packing, as a frameless bag cannot travel empty. Heavy items were placed in the narrow bottoms of these bags, and then clothing was packing in above (the clothing should be in its own separate, light-weight bag anyway). I also had to be careful that the bag would not bend into the wheel. An addition brace could be added to the rack to help with this problem.
Somewhat more support could have been provided by placing a piece of plywood between the fabric or by attaching the plywood to the rack. If the plywood attached to the rack is the same side and shape as the bag, there is no need for a frame anyway.
One characteristic must be true of any frameless bag: it must open from the top. The straps closing the bags will also support the outside panel of the bags while riding.
How does a frameless bag attach to the rack? One way is to let the inside panels of both pannier halves be one continuous piece of cloth. This was the trick that I used in 1966. In addition, the cover for these bags was another continuous piece of cloth, and the straps were attached to it. While this trick solves the problem very neatly, it also makes the bags hard to remove. In fact, they had to be emptied before I could take them off of the bike. In 1971, I tried another trick, attaching the two separate panniers to each other with webbing and buckles. While this solution allowed the bags to be handled separately, removing them while loaded would require two people. Due to the design of my carrier at that time, I did not try a third trick: attaching the panniers to the rack inself, using the webbing. But this should also work, and would allow the bags to be removed separately. One important question must be answered: How does one attach webbing to the nylon fabric? I placed the longer piece of webbing (the extra length for the buckle of course) on the outside of the bag and the shorter piece of webbing on the inside. Using the Speedy Stitcher, I sewed the two pieces of webbing together, with the pannier panel sandwiched between them.
If you make a frame, the easiest sheet materials would be thin metal flashing or ducting, plastic, or plywood. A frame can also be made using metal rods. As I have not made a frame using these materials, I cannot provide instructions. Most of the frames that I have seen do not really carry the weight; the material does that. For example, the frames that I use with my current bags are bottomless. As I have said, the purpose of the frames seems to be to maintain the shape when the bag is empty or partially empty, mainly for the sake of appearance.
A much more important characteristic of the bags than their appearance is their design. I find that most manufactured bags have two faults: 1) They are not designed to carry the things I want to carry, and 2) they interfer with the motion of my legs. While my big feet may be the problem in the second case, I highly recommend never purchasing or making any bags that interfer with the motion of your legs in any way.
When I designed my last set of bags, I knew exactly what I wanted to carry within them and where I wanted to put it. For example, I made the vertical pocket on the rear of the one bag because it was the perfect size to hold my rolled-up Thermorest mattress. The (almost) identical vertical pocket on the other bag is perfect for holding my gas stove, its fuel, and my water filter. I made sure that the openings on the front bags were large enough for my tent and sleeping bag because that's what I intended to carry there. It's possible to go overboard on this design, of course, by making everything a perfect fit and by later purchasing new equipment which doesn't fit.
To begin the design process, both for clearance and internal room, I always begin
with some newspapers, and I cut patterns and tape them to the bike and
spin the cranks with them attached, both sitting on the bike and looking
down, and looking from the side with a shoe in the toe clips (of course,
I have to spin them backwards). Your bags should never touch your shoes
or get in the way at all. The right rear bag, however, can completely cover
the derailleur; I can't see that the action is ever affected enough to
make a difference. You can also cover the quick releases. They are rarely
used, and you will still be able to reach them (don't cover them with a
frame though). I think most bags look silly and carry the weight too high because the manufacturers are
afraid of covering the axles of the bike.
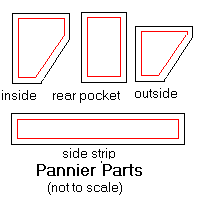 My patterns for a rear pannier bag look something like these: My patterns for a rear pannier bag look something like these:
Keep in mind that the exact shape and size of these patterns will vary from one design to another and so will the number of pieces. For instance, with the panel labeled "inside," you may want this panel doubled to place a stifener between the two pieces, or you may want to extend the pattern at the top to allow for a flap (as a cover) or you may even want to extend this panel into the panel on the other side of the bike, all one piece of cloth. In addition, you may want to use the panel marked "inside" as the outside, either to encorporate the closure for a side opening or because you have a top-opening bag. Likewise, the panel labeled "outside" can be the outside of the main bag or the outside of the pocket or both. The length of the strip at the bottom is determined by other decisions in your design. If your bag opens from the side, it will have to go all around the entire "inside" panel, but if your bag opens from the top, it will not extend across the top. A similar strip will be needed for the outside pocket, if you have one. The vertical strip labeled "rear pocket" is for a long vertical pocket behind the carrier, as I have on my panniers. It's width determines how large the pocket will be. Of course, there will be some pieces not shown here, such as the tops and bottoms for the vertical pockets, and covers for the main bag and/or outside pocket. In other words, this is not a specific design, and you will have to figure out the details for yourself. But that is the only way to get bags that exactly fit your needs. The patterns for the front bags will be more simple, as there is no reason for a foot cut-out on those bags.
One feature of these patterns can be easily overlooked, which I represent with a red line. What does that signify? That is the outside of each section of bag, the place where you will sew, and the extra material, say about an inch, is to prevent the bags from pulling themselves apart after they have been sewed together. This extra fabric can be used to greatly increase the strength of the bags and to make the seams waterproof at the same time.
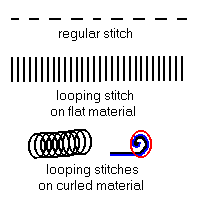 I must admit that my sewing has always been rather primitive, and that I have never had any instruction in sewing. Nonetheless, in making my bags in 1971, I discovered a stronger and better way to sew them, which I will now explain. However, this can only be used when sewing by hand. After I have cut out my material, I sew the panels together with a regular stitch to make sure that they are correct. Of course, I sew them together inside out and then turn them the other way around. Provided everything is OK, I turn them inside out again and begin the real task. If you are very uncertain about your design, you can sew together some bags using old sheets or cheap material to see what they will look like and how they will fit before beginning the task again with expensive nylon material. I must admit that my sewing has always been rather primitive, and that I have never had any instruction in sewing. Nonetheless, in making my bags in 1971, I discovered a stronger and better way to sew them, which I will now explain. However, this can only be used when sewing by hand. After I have cut out my material, I sew the panels together with a regular stitch to make sure that they are correct. Of course, I sew them together inside out and then turn them the other way around. Provided everything is OK, I turn them inside out again and begin the real task. If you are very uncertain about your design, you can sew together some bags using old sheets or cheap material to see what they will look like and how they will fit before beginning the task again with expensive nylon material.
To make the seams very strong and waterproof, I roll up the extra fabric, and then I make many looping stitches, very close together, around this roll of material. I also pull the thread through the loop each time, so each loop is actually a simple knot. To try to illustrate this, I have shown one piece of material as black, the other as blue, and the path the thread follows in red. These looping stitches have several advantages: 1) They bind up the rolled edges of material, preventing the entry of water, 2) they prevent fraying and unraveling, 3) they make it easier to place the stitches extremely close together, and 4) the extra thread in the loops can act as a shock absorber. IMPORTANT NOTE: Be sure
to use a rot-proof thread and not cotton, or your bags will fall apart
on you.
I also use another kind of looping stitch on flat material, such as on the edges of my zippers. Here, the needle makes two holes with every loop. The purpose for using this sewing pattern is to protect the edges from pulling apart and also to allow the stitches to be closer together.
One question I haven't answered is what material to use. Seattle Fabrics has from 330 Denier Cordura which weighs 4 oz. per square yard to 1050 Denier Ballistics at 16 oz. per square yard. However, I would suggest choosing one in the middle, such as 7 oz. 430 Denier Cordura, 8 oz. 500 Denier Cordura, or 11 oz. 1000 Denier Cordura. Campmor has 8½ oz. and 11 oz. fabrics. Basically, the heavier the material, the stiffer the sides of the bags. Even lighter fabrics than these can be used for liners, to make cloth bags for small items, etc. Making your own cloth bags is cheaper than buying them, and you can make them just the right size too!
The final issue I need to deal with is that of waterproofing, as I get a lot of questions about that. First of all, when I say that my bags are waterproof, I don't mean to say that no water ever gets inside. "Waterproof" nylon has lots of tiny cracks which allow water to seep in, and a heavy downpour from above and heavy splashing from below can result in water getting past a partially open zipper or past a weep-hole in the bottom (I put the seams on the bottom for any water to escape). Any item carried on the bike that can be damaged by water is wrapped in plastic bags. As an example of how waterproof my bags actually are, when I was caught in a torrential downpour in Canada in 2000, I was soaked to the bone in spite of wearing waterproof Gore-Tex (waterproof clothing cannot protect against floods of water running down the neck and out the legs). Although my clothes inside my panniers were wetter than they have ever been, they were really damp instead of wet, and they dried very quickly after I scattered them around the motel room. Normally, after leaving my bike in the rain all night, I could get out dry clothing in the morning. In comparison, when using the previous bags, I would have to stop at a laundromat on any rainy day, and sometimes I would find a pool of water in the bottom of the bags after removing everything.
Some measures can be taken to reduce moisture within the bags: 1) pick a good grade of waterproof nylon to begin with, 2) recess zippers so water won't run over them, 3) use water-resistant zippers, 4) carefully design weep holes for the bottom of the bags, 5) use seam sealer on all the seams, and 6) add epaulets or covers to the top of your bags which cover all zippered openings and which are held down with Velcro. I have used measures #1 and #2. I fully intended to make epaulets for my bags, but I haven't found them necessary. No matter how watertight the bags are, in very rainy weather, you will at least get some condensation inside.
While designing
your own bags may cause you to pull out your hair at times, if you persist
you will have something that will give you great pride and satisfaction.
|